Go API — Database Connection
Connect go api with PostgreSQL

In the previous article, we built the reverse proxy from the initial API design using gRPC and protocol buffers.
It’s time to connect our API to a database, we’ll use PostgreSQL this time.
If you missed the last article, I’d recommend reading the articles in the following order:
- Go API Design With Protocol Buffers and gRPC
- Building Reverse Proxy (gRPC-Gateway)
- Go API — Database Connection
From the previous article we had the following folder structure:

We created a go module inside the proxy folder, now we’ll create another module for the API itself. In the root directory run the following command:
go mod init github.com/yaairfernando/socialMediaThis will create a go.mod file in the root directory of our project. We’ll come back to this file to add dependencies later. For now, let’s also create a main.go file which would be the API entry point.
I like delegating tasks as much as possible from the main file, in this case, I am just calling the Run method on the server package, which we need to create next.
mkdir server
cd server
touch server.go
The server.go file is in charge to initialize the application and establish the database connection.
Before adding the logic to this file, let’s add two more services to the docker-compose.yaml file.
We need one service for our database and one more for the server.
For the postgres service, we’ll also need an init.sql file that will be run when the container starts. This file will contain the SQL to create the database.
The media service exposes port 8084 but runs internally on 8085, it also has some environment variables that we are passing, the DB_SQL_DATASOURCE which will be used to connect to the database, and the PORT which will be used later to initialize the server. It also specifies the docker file needed.
Let’s add the init.sql and the Dockerfile.
As I mentioned the init.sql file only creates the database.
The docker file uses golang version 1.8 and also requires a GITHUB_ACCESS_TOKEN argument to download private repositories. Make sure this file is located under ./build/Dockerfile.
Now let’s add the logic to the server.go file.
The initializeApp calls app.NewServer() which returns the server and an error, we’re not using the server at the moment.
We’re also getting the PORT environment variable that we’ll use later.
Let’s create another server file under theapp folder.
mkdir app
cd app
touch server.go
Let’s see how the server.go looks like.
This file represents the application’s server which will hold all database-related operations.
The Server struct has only one property Store of type store.Store. This is an interface that will include all the different DB stores the application handles. In this case the PostStore.
This file also delegates the initialization of the Store to a different package sqlstore.
Let’s add the store folder and files.
mkdir store
cd store
touch store.go
mkdir sqlstore
touch store.goThis last file contains the logic to connect to the database. Let’s explore this file to see what is doing.
We have two structs, the SqlStore which has one property stores of type SqlStores, then the SqlStores struct has the different database stores available, in this case, we only have the store.PostStore, which is an empty interface at the moment.
The New function has the following logic:
- Initializes the
SqlStore - Initializes the master database connection
- Runs the database migrations
- Returns the SQL store
As we can see the SqlStore struct has two pointer receiver methods, one to implement the store.Store interface and one more to create the database master connection.
The initMasterConnection method calls another function to set up the database connection, sending master as the connection type and the dataSource which is retrieved from the environment variable in line 110.
The setupConnection function does the following:
- Opens a database instance using the
driverNameanddataSource. - Returns an error if the previous step failed.
- Pings the database using the
dbinstance. - Sets maximum open connections.
- Returns the
dbinstance.
The function that pings the database connection has a really simple logic. It calls the PingContext method from the db instance using a context with a timeout. If that returns an error, it retries 10 times.
At this point, we have covered how to establish a database connection and ping it.
Let’s now see how to run migrations.
The runMigrations function does the following:
- Opens a database instance using the
driverNameanddataSource. - Returns an error if the previous step failed.
- Uses the package
golang-migrateto run all the migrations located under the folderdb/migrations.
We now have finished with the logic. Let’s download packages.
go mod download
go mod tidy
These are the dependencies needed in the go.mod file.
Migration to create Posts table
If you already have installed the golang-migrate package we can use the CLI tool to create a new migration.
Before that make sure to create the db/migrations folder.
mkdir db
cd db
mkdir migrations
To create a new migration run this command:
migrate create -ext sql -dir db/migrations -seq create_posts_tableThis will create two files in this directory
000001_create_posts_table.up.sql000001_create_posts_table.down.sql
In these files, we need to add the SQL needed to create and drop the table.
The SQL to drop the table is pretty simple:
DROP TABLE IF EXISTS posts;The SQL to create the table is the following:
CREATE TABLE IF NOT EXISTS posts (
  Id SERIAL,
  Title varchar(128) NOT NULL,
  Description varchar(255) NOT NULL,
  Status integer NOT NULL,
  MediaIds integer[4],
  ScheduledAt bigint DEFAULT NULL,
  DeletedAt bigint DEFAULT NULL,
  CreatedAt bigint NOT NULL,
  UpdatedAt bigint NOT NULL,
  PRIMARY KEY (Id)
)
With that the folder structure now looks like this:

Running docker services
We are now ready to run the docker-compose and see if the database connection was successful.
Let’s run the following command to build the services.
docker-compose up --buildYou should see this in the console
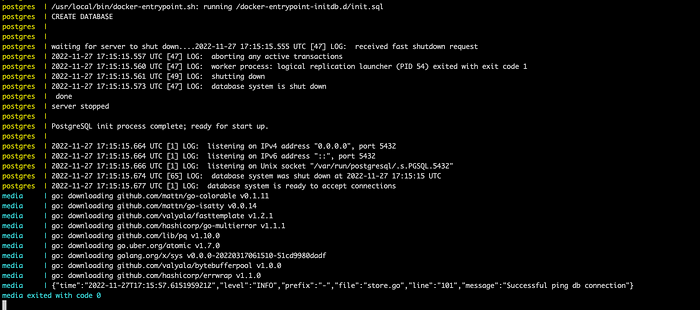
As you can see we have the log Successful ping db connection which means the connection to the DB was correct.
We also see at the top of the image CREATE DATABASE which means that the init/sql file ran correctly as well.
Lastly, we did not get any errors regarding the migrations, which means they ran smoothly as well.
If we want to make sure that the migrations were applied correctly we can enter the postgres container and check.
To do that let’s follow these steps:
- Enter the container using bash:
docker exec -it postgres bash - Access the console with the
postgresuser:psql -U postgres - List all the databases:
\l+

- Connect to a specific database:
\c social_media_development - List all tables:
\d+

- Select everything from the posts table:
select * from posts

As you can see the migration was applied correctly and the posts table was created.
Key Takeaways
- Added two more services to our docker-compose file, one for the database and one for the server.
- Learned how to connect a postgres database with a golang application using docker.
- Learned how to run migrations using
golang-migrate - Learned how to inspect a docker container using
docker exec - Successfully ping the database connection
That is all for this article. In the next article, we’ll implement the server logic and the first API endpoint.
Stay tuned, and thank you for reading!